|
Enter New Emissions Data
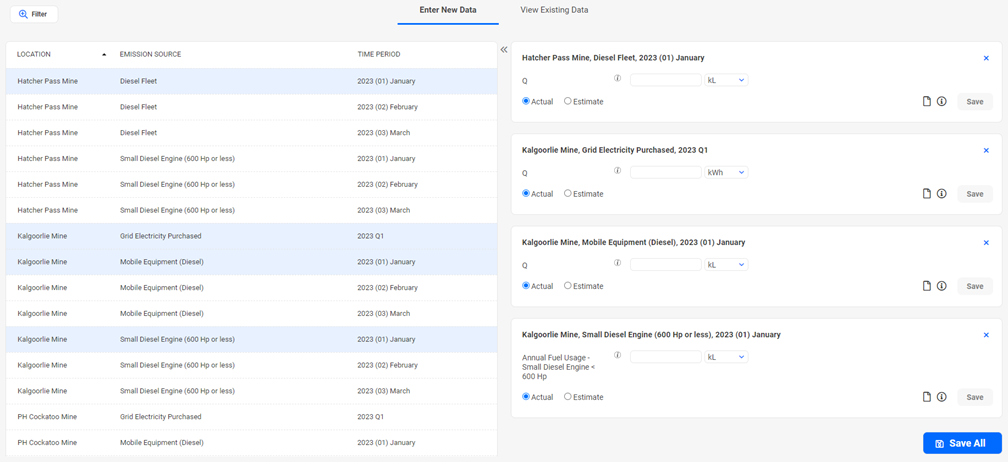
- Click on the Location / Company / Emission Source / Time Period displayed on the left panel to highlight the entry for which you choose to enter in data. For each selected record, the system will display a corresponding data entry screen in the right panel.

|
TIP:
Use [CTRL + <Click] OR [SHIFT + <Click>] to enter multiple data at the same time
|
- For more information on each field, click on the "i" icon
|
NOTE:
This icon will only be displayed if information has been provided for this Input field set by the Emissions Administrator
|
- The system will display the default Unit of Measure (UoM). However, you can choose to select an alternative measure from the list.
- You must choose whether the data being entered is an Estimate or an "Actual" figure. The value will default to Actual for all unentered data.
- Once the data is entered, you can either choose to Save individual entries or select Save All to save all the data.
|
NOTE:
Once a record has been saved it will remain in this list until the page is refreshed, thereafter the record will be moved to Incomplete Data or Existing Data list
|
- You can add and upload one or several Files by clicking on the File icon:

|
TIP: Filter Button
Clicking on the Filter button  provides a range of attributes to refine the data presented in the Input screen. provides a range of attributes to refine the data presented in the Input screen.
Clients with large data volumes can enable 'Show Filter Panel before loading Outstanding Data' option in Global Settings to display the “Filter” panel before data is loaded in the Outstanding Data Portal. This ensures that only a subset of the data is loaded, helping to reduce waiting times.
|
|
NOTE
If there is a mapping setup between Metrics Management and Emissions Management module, those entries will be rendered read only under the Enter New Data tab with the label 'Linked to Metric'.
Once the data is entered from Metrics module,
- the system will push those values into the Emissions Source’s Formula Inputs,
- calculate the emissions (using the Calculation linked to that Emission source) and
- generate a system comment to denote that the values were pushed from Sustainability Metrics.
|
|