|
Menu Designer

|
Prerequisites
The steps below are made under the assumption that all List Views and Tree Views have already been defined.
|

|
NOTE
You may find Forms, Views, Workspaces etc. in the Design Tools which will only be available to any user once a license has been obtained, and the feature has been unlocked.
One example is: Emissions Management.
|
The Menu Designer is a graphical Design Tool, which allows the definition and modification of the Workspace Menu Structure.
The Designer has two distinct regions:
PANEL
|
CONTENT
|
Menu Designer
|
In this panel, you define the content and the structure of the Workspace Menu.
|
Workspace Designer
|
This panel is designed to define the content of individual Workspaces, by adding, removing and ordering List and Tree Views to Workspaces.
|
Menu Designer
The Menu Designer is the tool to create, edit and to delete items from the menu.
Menu Designer
|
For the task of ...
|
I need to ...
|
Adding a Menu Item on the 1st Level of the Menu
|
Click on "Workspace", and then select Add Menu Item.
The system will create a new item at the very bottom of the list.
Click on the new item and set its name.
|
Adding a Menu Item on the 2nd Level of the Menu.
For example an item, which you can access via Administration  New Item. New Item.
|
Click on the Menu Item under which the new item shall be listed, and the system will create a new item under the selected entry.
Click on the new item and set its name.
|
Moving Items to a new location in the Menu.
|
Use "Drag & Drop" to move items around the menu structure.
- To drop an item above or below, but on the same level like an existing item, place the mouse cursor so that a line is shown above or below the target item, and release it.
- To drop an item as a sub-item of another item, place the cursor directly on the item, and release it.
- In case you position the item on an invalid location, the system will indicate the incorrect location by changing the color of the dragged item, and you will not be able to drop it at the current location.
|
Deleting Menu Items, and ALL the related children.
|
Select the item you want to delete and click on Remove Menu Item.

|
Please be aware that removing Menu Items will also remove ALL of the children of this item.
|
|
Identifying if a Menu Item has been modified.
|
If a Menu Item has been modified, the system will change the color of the label to blue.
|
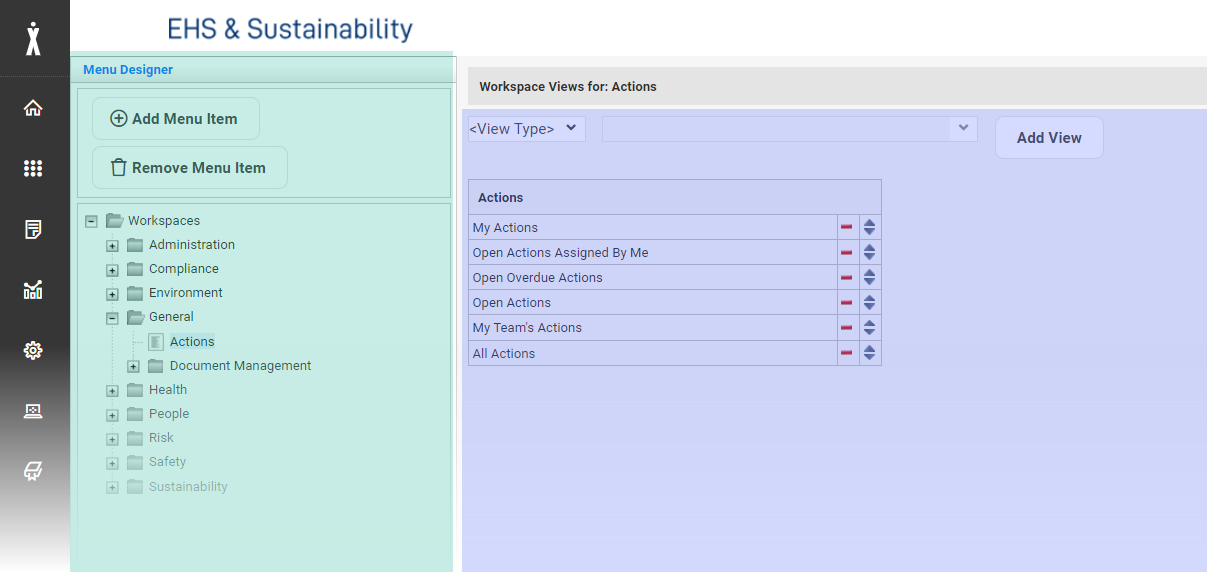
Workspace Designer
A Workspace is a collection of List and Tree Views.
To add. remove or re-organize Views on a Workspace, you will be using the Workspace Designer.
|
- A Workspace can contain as many, or as few entries as required.
- A Workspace can contain List Views and Tree Views from multiple Components
|
|
Each List View or Tree View can only be listed in ONE Workspace.
Or in other words: it is NOT POSSIBLE to link a View to more than one Workspace.
|
Workspace Designer
|
For the task of ...
|
I need to ...
|
Adding a View to a Workspace
|
Select the target Workspace in the Menu Designer, and then in the Workspace Designer
- Select if you want to add a List View, or a Tree View.
- Either enter the name of the required View, or click on the Arrow in the Combo Box to retrieve a list of available views.
- Once the View has been selected, click Add View
|
Removing a View from a Workspace
|
In the Workspace Designer select the View in the current Workspace. Click on the "-" symbol to remove the View.
|
Changing the Order of Views within a Workspace
|
In the Workspace, select the View you intend to move and use the "up/down" arrows to move the View up or down.
|
Moving a View from one Workspace to another.
|
Due to the restriction that each View can only be associated to one Workspace, you will first need to remove the View from it's current Workspace, before you can add it to it's new location.
|
|
