|
List View Designer

|
Prerequisites
The steps below are made under the assumption that the underlying Component, upon which the form is based, and all the required fields, have already been defined.
Please see the Web Application Component Management for more details.
|
With the use of the List View Designer, the application offers a WYSIWIG interface to define the Layout and Content of a List View.
Configuration is done by simply
- Selecting the Starting (Root) Component
- Dragging and dropping the required fields or relationship into the required column.
- Setting some of the Properties.
List Designer
The List Designer is made up of 3 different regions, which in the image below are marked by different colors:
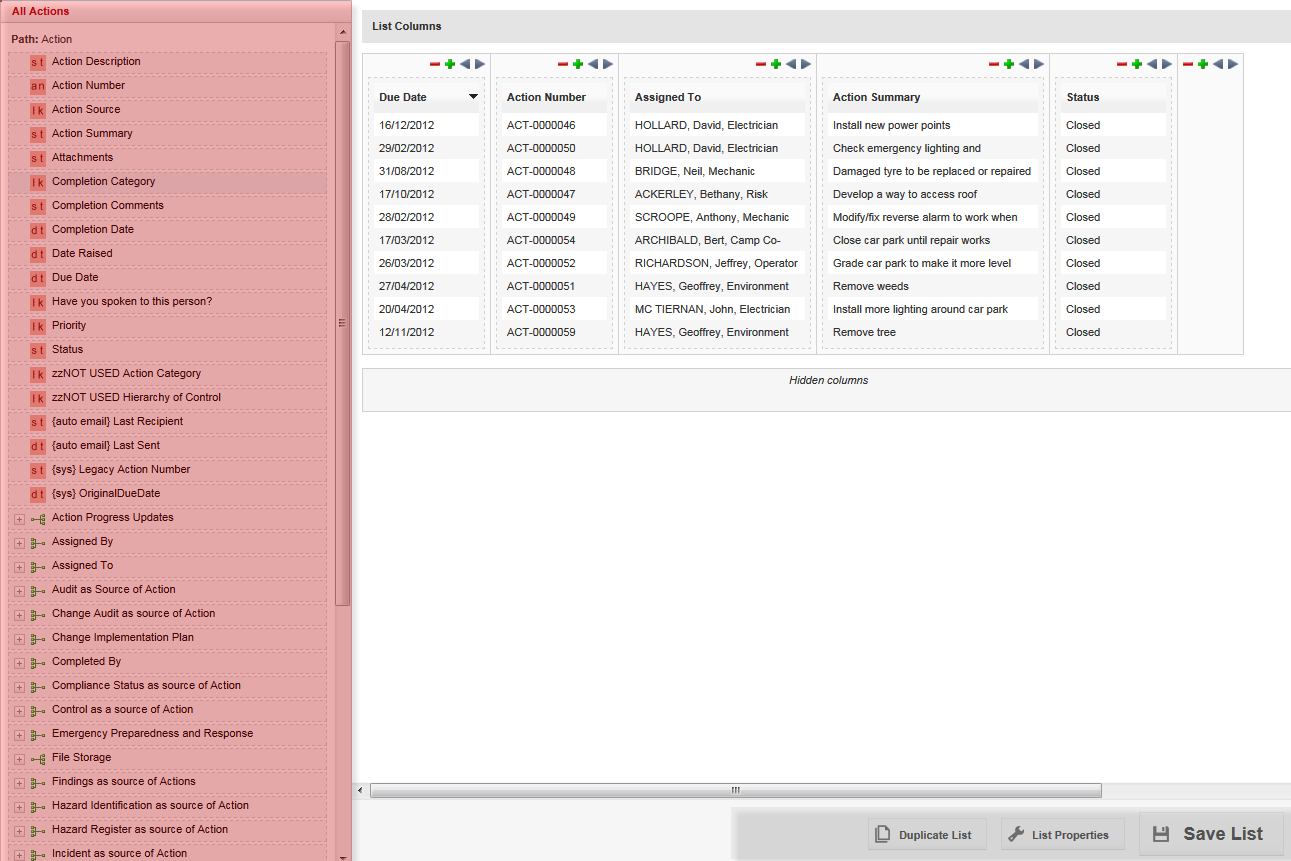
The function of the various panels is as follows:
PANEL
|
CONTENT
|
Content Palette
|
The Content Palette is a collection of the fields and relationships which can be used on a List View, simply by dragging them onto the canvas.
It shows
- Data Fields:
A list of all fields of the current Root Component, as well as all the Component's Relationships.
|
Canvas
|
This is the main control, where you create the list view:
- create columns
- re-order the columns
- define the width of the columns
|
Toolbar
|
From here, you can Duplicate the list, access the List Properties and save the List.
|
I want to define a List View
To define the List View, you will be using the Content Palette and the Canvas.
For the task of ...
|
I need to ...
|
Adding a Column to a List View
|
Drag and drop the required Field, or Relationship, into the blank pane on the canvas.
NOTE: the system will populate the column with sample data, which will not necessarily reflect the records in the Web Application.
|
Inserting a Column between already existing Columns
|
- Either drag and drop the required field, or Relationship into the blank pane, and then use the "arrow" control (e.g.
 ) to move the column to the required position ) to move the column to the required position - Or click the "+" symbol on the column to the left of the required position and then drag/drop as described above.
|
Deleting a Column from a List View
|
Click on the "-" symbol on the columns you want to remove.
|
Defining the (relative) Width of a Column
|
Point and click your mouse-cursor on the right borderline of the column you want resize, and drag the line to the left or right to resize the column.
NOTE: the width defined here is
- NOT the ABSOLUTE width of each column (because this is depending on the screens used by the End Users).
- but the RELATIVE width of the columns to each other. For example, if you design a column to be double as wide as another column, this ratio will be maintained across different screen sizes).
|
Duplicating an existing List View
|
Click on Duplicate List.
NOTE: duplicating a List View will be necessary if you intend to use the same View in several Workspaces. This is because each List View can only be used ONCE within the entire Menu Structure.
|
Using a List View as a Default Component List View
|
If you intend to use a View as a Default Component List View, then the View must not contain fields from a related component, since these will be displayed as "####" only.
For example on the Person Component:
- OK: Supervisor
- Not OK: Supervisor.First Name
|
Adding hyperlinks to a List View
|
Should a record on a List View contain text which resembles a URL or an email address, then the web application will automatically convert these strings into a hyperlink - i.e. a user can click on this link and the system will access the link as defined.
Examples are:
- joe.blogs@acme.com This will create an email to this address
- www.evotix.com
- google.com
|
When do I need the "Hidden columns"
Hidden columns are only necessary when you intend to use this List View as a Grid View, and you intend to Default, or perform Actions on Fields which are hidden from the user.
|
