Link Widget Properties
|
For the task of ...
|
I need to ...
|
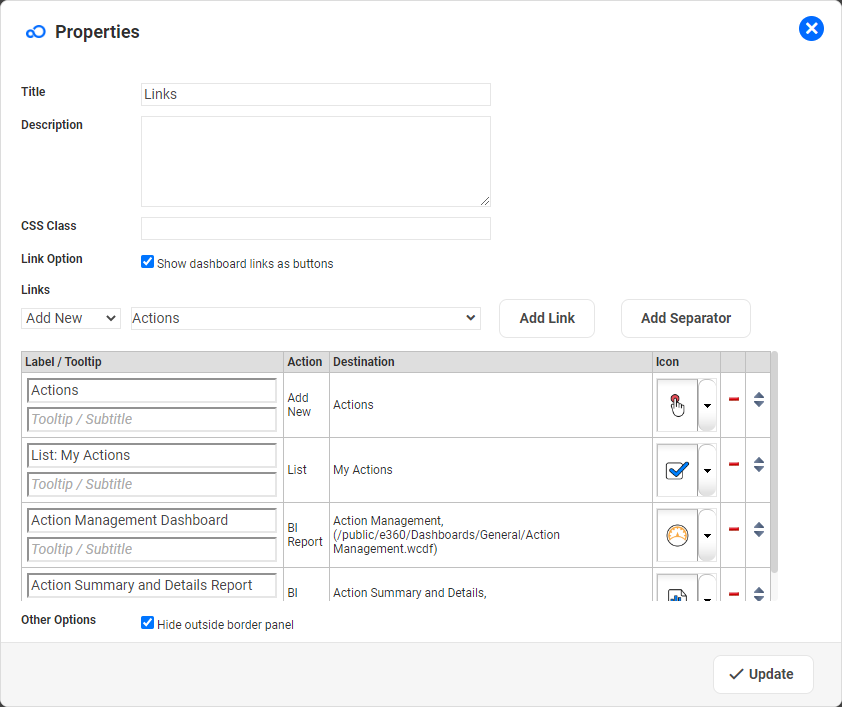
Defining the Title for this Widget (group of links)
|
Update the Title
|
Adding a Description of this widget.
|
Update the Description
|
Applying a specific style to the widget
|
A CSS Class can be used by Designers to apply specific CSS to the widget, enhancing the ability to individually style widgets.
The CSS will apply to all items within the widget.
|
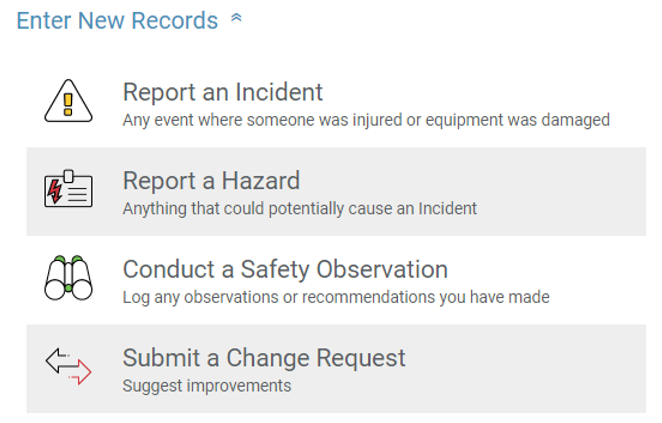
Displaying the Link as a button
|
As a Designer, you have the option to display Links (within this widget) either as a text with a hyperlink, or as buttons.
|
Defining the Link Type, and selecting the actual Target
|
Select Links Type and then add the required information.
The options are:
To
|
Select Link Type
|
And then
|
Create a New Record
|
Add New
|
Select the Component for which you want to create a New Record.
|
Directly access a BI Report
|
BI Report
|
Select the BI Report or the BI Dashboard to access.
|
Go to another Dashboard
|
Dashboard
|
Select the Dashboard to which will be opened.
|
A Document which is stored on your network
|
File
|
Enter the URL Link to the File, for example:
|
|
Add a direct link to the Online Help.
|
Help
|
N/A
|
Display a particular List View for direct access, e.g.:
My Actions
|
List
|
Select the List View which will be opened.
|
Display a particular List View, including a current record count, for direct access, e.g.:
My Actions (5)
|
List with count
|
Select the List View which the system shall access.
Limitation: mandatory/optional Top Node Filters for Tree Views will be disregarded for the calculation.
|
Add a direct link to the Login/Logout Dialog.
|
Login/Logout
|
N/A
|
Add a link to the user's Profile Page
|
My Profile
|
N/A
|
Access a Web Page
|
URL
|
- Enter the URL to the target site, for example:
http://www.evotix.com
- Instead of using a 'hard-coded' URL, it is also possible to refer to a User Constant (Type = text, Value = URL address) to build the link.
To use a constant, define the constant first and then embed it by using the Constant ID between two '#' symbols, like in this example:
http://#USER_CONSTANT_ID#
NOTE: the name of the constant is case sensitive.
|
Send an Email to a fixed address
|
URL
|
Enter the URL, for example:
mailto:someone@example.com
|
Once the selection has been made:
|
Displaying a Tooltip, or a Subtitle
|
Any text entered here will be used either as a
- Tooltip: when the link is displayed as text, and when the user hovers over the link.
- Subtitle: when the link is displayed as a button:

|
Adding an icon to a button
|
You can display a Link as a button and can optionally show an icon in the button.
Icons that are available for use are located in the main folder on the application server:
...\SAI360\custom\icons
- You can add and update existing icons.
- Icons can be of any image type (gif, jpg, png), with a minimum size of 40px * 40px. Larger Icons will be automatically shrunk to that size.
|
Adding a Header, or a Line as a separator
|
Click on Add Separator and then enter the required Label.
NOTE:
Unlike the Links, the Separator will be displayed in BOLD on the Dashboard.
|
Changing the Order of the Links in a Widget
|
Use the Up/Down arrows next to the individual List items to move them to the desired location.
|
Removing a Link from a Widget
|
Click on the "-" symbol adjacent to the Link which needs to be removed.
|