|
Creating Action Group, and the individual Actions
Creating a new Action Group
- Creating a new Action Group:
- To create a new Action Group from scratch, either:
- select Add Action Group to add it to the end of the list of existing Action Groups.
- click on the "+" in the Action Group to slot in a new Group beneath the current Action Group

- To duplicate an entire Action Group, you will need to click on the "Duplicate" link, which will become available once an Action Group is in "edit mode".
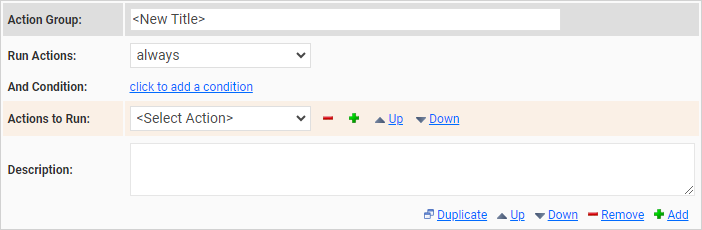
- Name the Action:
give each Action Group a unique and descriptive Name, so at a later stage you can easily identify them when you need to search for a particular Action Group in a form.
- Define WHEN the Action(s) within this Group need to be triggered:
you have control to decide when, and/or under which conditions the Actions within a Group are to be triggered.
Action Group Trigger
|
To trigger the Action(s) within a Group ...
|
I need to ...
|
A-1) Every time when a record is saved.
NOTE:
Email Actions have slightly modified rules. Please check the Email Designer Section.
|
- Select Run Actions: always
|
A-2) Every time when a record is saved, but only when a certain condition is met.
|
- Select Run Actions: always
- Define the condition which needs to be met by clicking on 'click to add a condition'
|
B-1) Only when a newly created record is saved for the first time.
|
- Select Run Actions: on first save
|
B-2) Only when a newly created record is saved for the first time, and only when a certain condition is met.
|
- Select Run Actions: on first save
- Define the condition which needs to be met by clicking on 'click to add a condition'
|
C-1) Each time when a field has been modified.
|
- Select Run Actions: when field is modified
- Then select the field which, when it's content is modified, will trigger the Action.
|
C-2) Every time when a field has been modified, but only when a certain condition is met.
|
- Select Run Actions: when field is modified
- Then select the field which, when it's content is modified, will trigger the Action.
- Define the condition which needs to be met by clicking on 'click to add a condition'.
|
D-1) Each time when any field on a given page is modified.
This does include the adding, editing or deleting of subform records.
|
- Select Run Actions: when page is modified
- Then select the page which, when the content of any of it's fields is modified, will trigger the Action.
|
D-2) Each time when any field on a given page is modified, but only when a certain condition is met.
This does include the adding, editing or deleting of subform records.
|
- Select Run Actions: when page is modified
- Then select the page which, when the content of any of it's fields is modified, will trigger the Action.
- Define the condition which needs to be met by clicking on 'click to add a condition'
|
E-1) Any time when Workflow Status changes.
|
 PREREQUISITE PREREQUISITE
Before you can define this type of Action triggers, you need to set up Workflow Indicators for the current Form.
- Select Run Actions: when Workflow Status changes
- Then define the Status transition by selecting From <Status> and To <Status>.
- Note that these triggers will only work when editing existing records. No such Action will be triggered when creating a new record.
 Please take note: Please take note:
- You cannot define a "Set Value" Action which is triggered by a Status change.
- If you get unexpected results at run-time, make sure that no old-style 'Set Status' Actions exist on the Form.
|
E-2) Any time when Workflow Status changes, but only when a certain condition is met.
|
PREREQUISITE
Before you can define this type of Action triggers, you need to set up Workflow Indicators for the current Form.
- Select Run Actions: when Workflow Status changes
- Then define the Status transition by selecting From <Status> and To <Status>.
- Note that these triggers will only work when editing existing records. No such Action will be triggered when creating a new record.
- Define the condition which needs to be met by clicking on 'click to add a condition'.
Please take note:
- You cannot define a "Set Value" Action which is triggered by a Status change.
- If you get unexpected results at run-time, make sure that no old-style 'Set Status' Actions exist on the Form.
|
Specifying the individual Actions which need to be run
For each Action Group, you can select one, or several Actions which need to be run when the trigger conditions are met.
You can ADD Actions to a Group by clicking on the '+' icon, or REMOVE them by selecting the '-' icon.
Action Types
|
If you need to ...
|
Select to RUN ACTION ...
|
And then ...
|
Close a Form
|
Close Form
|
N/A
|
Send out an Email
|
Email Action
|
use the Email Designer to create and define the email
|
Create a new Record for a different Process
|
Open Form
|
from the list which is presented by the application, select the Form which needs to be opened.
|
Interact with an external system via a REST call
|
Rest Callout
|
Use the Rest Callout Designer to create the Rest Call.
|
Create a copy of the current record as a PDF file
|
Save to PDF
|
select the File Attachment relationship to which the file needs to be saved.
If you select a
- to-one relationship: the action will replace any already existing file.
- to-many relationship: a new copy is added, while retaining existing files.
Note:
when selecting the to-many option, we suggest to define a trigger condition to control the number of records created - especially for records which are saved many times over their life-span
|
Copy or set the value of a field
|
Set Value
|
use the Set Value Designer to define the details.
|
Send "pop-up" System Notifications
|
System Notifications
|
use the System Notification Designer to create and define the notification.
Note:
for these to work, you will need to also define a Notification Hub URL under the System Tabs in Global Settings.
|
While creating a new Action - what if I selected an incorrect Action Type?
Once an Action Type has been selected (e.g. Email, or Set Value), the selector becomes read only, and it cannot be changed.
If you have selected the incorrect Action Type, you will need to delete it (using the "-" icon), and then again add the correct Action (using the "+" icon).
|
