|
How to define Workflow Status

|
Before defining Workflow States, you need to make sure that in Form Properties you select:
- Enable Workflow
- Optional: Show Workflow
if you wish to have a visual Indicator on the Form.
IMPORTANT:
- As these Workflow Statuses supersede the old "Set Status" form actions, it is also necessary to delete all Set Status Actions on any Workflow-enabled Form.
|
In the application, each record has a 'Base State' of Open or Closed. You can refine a workflow by defining multiple 'Workflow Statuses' to each Base State and defining the conditions under which a record will be set to that Status The system will then automatically manage the transition of a record’s Status according to the defined rules.
You can assign multiple 'Workflow Statuses' to each Base State.
For example:
- Base State: Open
- Raised
- In Progress
- Under Investigation
- Investigation finished
- Base State: Closed
- Accepted and Closed
- Rejected and Closed
Defining Workflow Status
Workflow Status
|
For the task of ...
|
I need to ...
|
Accessing the Workflow Status Designer
|
In Form Designer, click on Workflow.
|
Creating a new Status
|
Click on the '+'
|
Defining each State
|
For each Status, you need to define:
- Status Name: used to describe the current Status
- Status Description: any text entered here will be used as a tool tip when user is hovering the pointer over the current Status
- Base State Mapping: each State needs to be mapped to the Base State of either 'Open' or 'Closed'.
- Is Active:
- when selected: State is in use
- when deselected: State will be ignored - Workflow Condition: define the Condition for which the Status will be assigned by accessing the Condition Builder.
- Visibility:
you have the option to
- Always Show
- Conditionally Show - the Status will only be shown in the Workflow Indicator (if enabled) when a defined Condition is met.
|
Setting the Order/Sequence
|
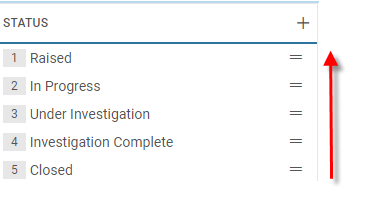
To define the correct order of the various Statuses, just click and drag each Status into the desired sequence position.
NOTE:
If a record matches multiple conditions, the system will assign the highest/most advanced Status - thus eliminating the need to define 'exclusion' conditions for lower ranked Statuses.
In technical terms: the system will evaluate the Status conditions from the highest (in this example: 5 = Closed) to the lowest (here: 1 = Raised) rank, and will assign the first match as the current status.
In this example, should a condition match status 3 AND 4, the system will assign Status 4.

|
Save your Changes
|
Click on Save.
To propagate the changes, a publish is required.
|
Using an existing Workflow definition from another form
|
 PREREQUISITE: PREREQUISITE:
Only available when there are multiple forms for a given base component, for example when there are separate forms for the web application and for Roam.
To utilize an existing Workflow already defined for another form, here named the 'Master' form:
- Turn on switch Use Workflow defined in 'Master' Form.
- Select the Master Form (only forms based on the same component will be available for selection.
- Once this option has been chosen, the Workflow settings in the current page will become read-only, and any settings you already may have will be ignored.
|
Use of Workflow in Validations
|
 PLEASE READ PLEASE READ
When using a Workflow Status for Validations, please be aware of the following:
- The Status can only be used in the WHEN condition.
- Validations are run BEFORE the Workflow Status is set.
I.e. when you have a validation to trigger WHEN a certain status exists, then the system will evaluate the Status as it is when the Save button is clicked - not on the Status after the record has been saved.
|
|


 PLEASE READ