|
Example: Simple 2-dimensional Matrix
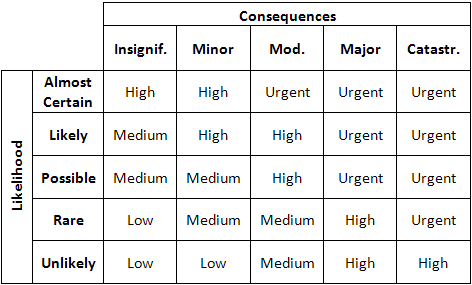
In this example, you will create a Risk Assessment matrix that will use 'Consequences' and 'Probability' as the areas that will be mapped to give a Risk Assessment result.
- In the Web Application, select Designer
 Field Types Field Types  Matrix from the menu. Existing matrices list in alphabetical order. Matrix from the menu. Existing matrices list in alphabetical order. - Click New
- In the Name field, type the title of the new matrix -
Risk Assessment - then you can optionally enter a Description. - Save the record.
- Move to the Column Axis Definition
- In the Name field, type the title of the column -
Consequence. - Add the following values to the column:
Catastrophic, Insignificant, Major, Minor, Moderate - Now sort the entries to put them in a more logical order. Select the value using the
 , then using the , then using the  or or  arrows to move it to the desired position. You will need to repeat this for every item that needs to be reordered. The end result should be: arrows to move it to the desired position. You will need to repeat this for every item that needs to be reordered. The end result should be: Insignificant, Minor, Moderate, Major, Catastrophic - Save the record.
- Move to the Row Axis Definition
- In the Name field, type the title of the row -
Probability. - Add the following values to the row:
Unlikely, Rare, Possible, Likely, Almost Certain - Save the record.
- Move to Results Definition
- In the Name field, type the title of the Results Definition:
Risk Assessment - Enter the following values for the results:
Low, Medium, High, UrgentNote: in this example, you could theoretically add up to 25 results (Number or Rows * Number of Columns). However, this number can become unmanageable, so we recommend that you use a smaller number and combine certain row and column values in the results matrix.
- Save the record.
- Move to Matrix Results
- The System displays a list of all possible permutations of Column and Row Values, in this example 25.
- Enter Results according to this matrix

- Save the record
|

