|
Retrieving Information using Views

|
ASSUMPTION
As the access to Views is controlled by security, the following section does assume that the User does have access rights to the Views.
Views to which a User does not have access to, are not displayed.
|
I want to access a View
As the name suggests, Views are a filtered collection of records which are represented as a List - either presented in form of a grid, or as a hierarchical tree. Some Processes/Modules
- may only have one View (for example "Personnel"),
- or may have many Views (for example "Open Actions", "Closed Actions", "My Actions")
Accessing Views
|
For the task of ...
|
I need to ...
|
Accessing a View via the Menu
|
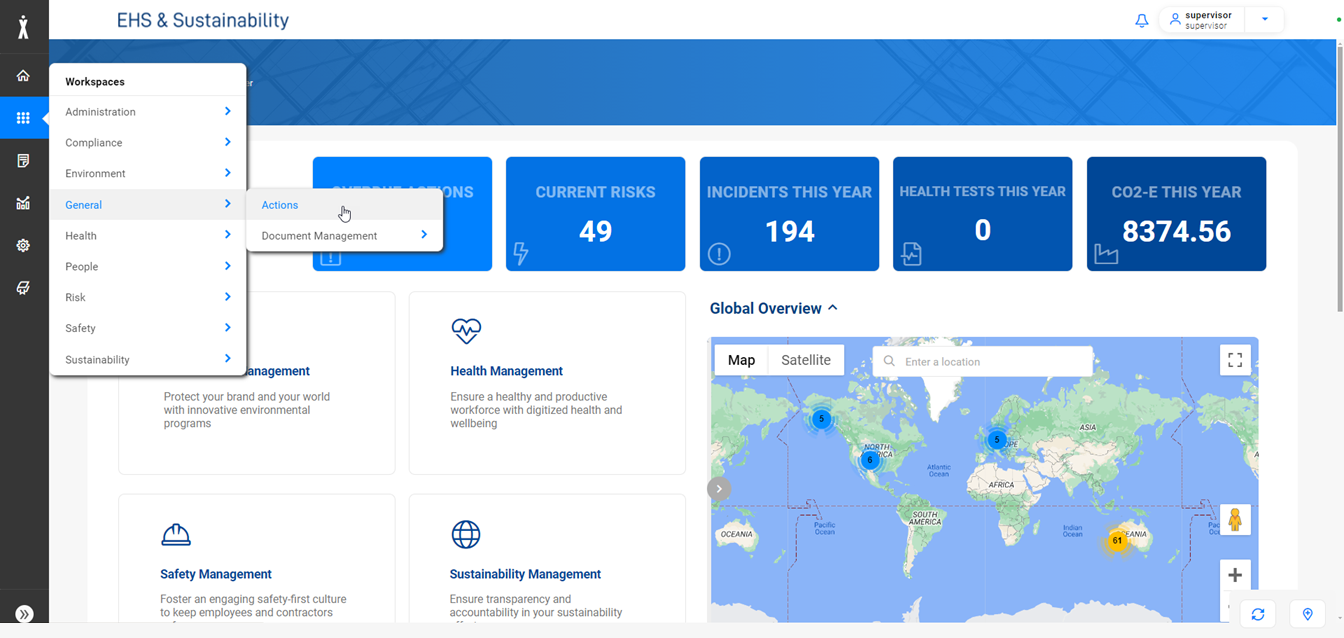
Since all Views are part of a "Workspace", you will need to navigate to the Workspace which contains your View.
- Start by selecting "Workspace", and then follow the path which will take you to the required Workspace.
NOTE:
The menu structure is only an example. Since each client can define their own menu, the content of your menu may be different to the one shown above.
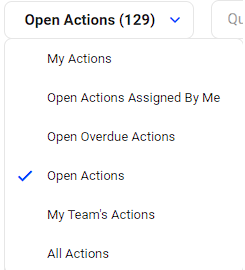
- Once you have accessed the Workspace, select the required View.
|
Accessing a View via a Dashboard (this includes the Home Page)
|
Your View may be included on the Home Page, or on another Dashboard. If this is the case, simply click on the link on the Dashboard, and the system will take you directly to the selected View.
|
Directly accessing a View via "Smart URL"
|
Views can be directly accessed from outside the application by using the "Smart URL" functionality, for example:
http://server-name:8080/NetForms/list/Open-Incidents
These URL can be contained in an email, or they also can be used as Bookmarks in your Browser.
|
Interactions with a View

|
NOTE
Depending on the access rights, or the way the system is set-up, some of the options listed below (for example DELETE or NEW) may not be available to a User.
|
Working with Views
|
For the task of ...
|
I need to ...
|
Selecting a Record for editing
|
There are the following options:
- If the list contains an auto-number field, for example the Incident Number (INC-12345), you can
- click on that number to open the record in the current window.
- right-click on that number to open the record in a new browser tab, or in a new browser window. - If there is no auto-number field, click on the first column.
- Double-click on the record.
|
Creating a New Record
|
Click on the New button
|
Resizing of Columns, or changing their order.
|
You have these two options:
- You can resize a column by clicking on and dragging the right hand side of the header.
- To change the order of the columns, click on and drag the header to the left or right, as required.
|
Sorting a single Column
|
Click on the Header of the Column you need to sort. Repeated clicking will toggle between Sort Ascending and Sort Descending.
NOTE:
- Some columns cannot be sorted. As a result, clicking on such columns will not affect any changes.
|
Quick Filtering of a List View
|
The "Quick Filter" for List View allows users to filter a List View across all currently visible columns - not just a single column.
Here are a few handy hints to make the best use of this functionality:
Entered Search Phrase
|
System will search for ...
|
truck
|
System fill find any view entries where any of the text includes the string 'truck', for example:
|
truck driver
%truck driver%
|
As the system by default ANDs the search terms, this example will return any records which contain the exact term 'truck driver', regardless of other text present.
|
truck%
|
Any records where the text begins with the word 'truck'.
|
%truck
|
Any records where the text ends with the word 'truck'
|
"truck driver"
|
As above, but now the system will also look for the double-quotes and search for "truck driver"
|
truck OR car
|
Any text containing the word 'truck' or the word 'car'.
NOTE: the OR is case-sensitive. You have to write it in UPPER case to initiate an 'or' search.
|
ackerley, bethany, risk
|
If one of the columns in your view lists persons, for example "Reported by" for Incidents, this search will return all records for:
"ACKERLEY, Bethany, Risk Manager".
|
10
|
Being a number, the search will include Text AND Number fields. It will find:
- in text fields:
every occurrence of the string '10'. For example:
- ... damage to 100 meters of piping
- INC-20010
- INC-20105 - in number fields: every occurrence of exactly the number 10
|
Four digit numbers: 2016
|
Search on date fields via the Quick Filter is limited to the year only.
To search for a year, you will need to enter the year as a 4 digit number.
|
|
Filtering a Column
|
To sort on a single column, hover your mouse pointer over the column header.
If a filter can be applied to that column, a click on the "funnel" symbol. This will reveal an interface where you can define the filter condition for the column.
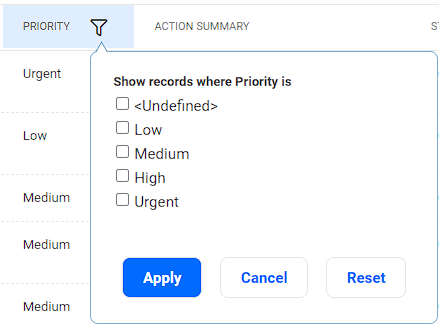
The layout of the interface will vary, depending on the field type.
Once a filter has been applied to a column, the header will display a funnel symbol.

|
Accessing a previous, or following page of the List View
|
Use the controls at the bottom of the List View, to either scroll forward or backward page by page, or the directly access a particular page.

|
Saving changes to a View
|
After making changes to the layout of a List View (resizing. rearranging, adding or removing columns) you can save these changes.
You can also "undo" changes to return the view into it's original state - just click on the Undo button next to the Save button.
To save, click on the Save button next to the List View Name and then name this view.
This new view will be saved as a sub-menu entry of the Designer View from which it originated:
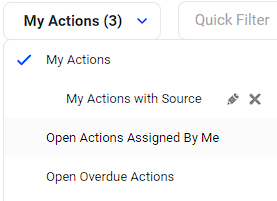
These private User Views:
- apply only for the individual Users who created them. They cannot be shared.
(If you want to share, see "Advanced User View" functionality below.) - Can be renamed by clicking on the "pen" symbol.
- Can be deleted by clicking on the "x" next to the view.
|
 Additional Options under the Wrench Menu Additional Options under the Wrench Menu
|
Add/Remove Columns
|
User can add or remove Columns to/from the current List View.
After selecting this option users will be presented with an interface like the following:
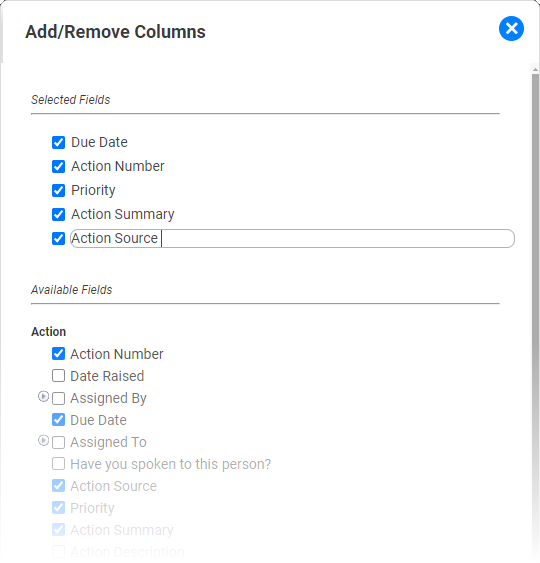
Selected Fields
- Fields which are currently shown in the List View
- De-select to remove from the List View
- You can rename the Field for the List View by clicking on the label.
Available Fields
- Lists all Fields which can be added to the List View.
The system will only display fields and relationships which are on a Form, and accessible to a user. - When selecting a field, it will be added to the above section Selected Fields.
- Users have option to either add the relationship (e.g. "Assigned By"), or a field from the relationship (e.g. "Assigned By : First Name").
|
Sorting on multiple Columns
|
Use the "Sort Multiple Columns" option under the wrench symbol.
You can add or remove additional "sort by" columns. The order in which you select the columns will be the order in which the content of the view will be sorted.
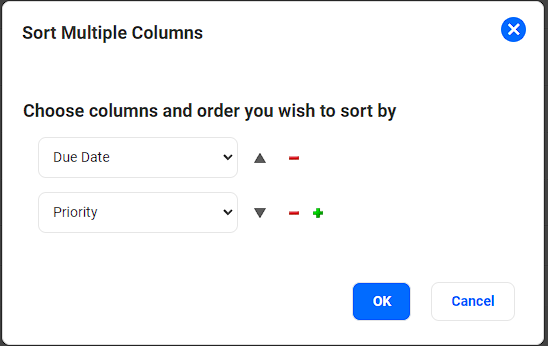
The ASC or DESC order can be toggled by clicking on the caret next to the name of the column.
|
Exporting the content of the current View
|
You can export the content of the current view, up to 100,000 records, by clicking on the Export button (which you find under the wrench icon).
You have the option to either export the records as
- an Excel document (format used: XLSX)
- a CSV file
To retrieve the records, users can select to
- Download:
the system will prepare the file in a background process.
Once ready, the user will receive a Notification in the browser, and they can initiate the download by clicking on the Notification. - Email:
the system will again prepare the file in a background process and, once ready, will email the file to the email address provided.
(If the current User account [not the Person account] has an email address defined, then the email field will be defaulted.)
 Only users with the Policy Role of List View Export will have access to this functionality. Only users with the Policy Role of List View Export will have access to this functionality.
|
Pinning or unpinning a View under Shortcuts
|
As a user you can add (pin) a View to the Shortcuts menu by clicking on the Pin button.
In the same fashion, you can remove it from your Shortcuts by clicking on Unpin.
|
Selecting one, or several Records for deleting
|
Click on the record(s) you need to delete, and then select the Delete button.
Note that this button is only available if the user has Delete access.
|
Updating of multiple Records
|
By clicking on Bulk Update Users can access the Bulk Update interface.
Check the Entering Data section for more details about this feature.
|
Advanced User View functionality
|
User with additional privileges can access Advanced Functionality for List Views:
|
Modifying the Filter which is applied to a View
|
To be able to perform this task, a User needs additional privileges.
|
|


