|
Entering Data into Evotix 360
To ensure good data quality, and to improve workflows and processes, the application will
- Validate the information entered by users.
- Control the workflow, so users are encouraged to enter information in a particular order and only enter the information which is necessary.
- Forward information to the parties concerned, so that further steps can be initiated.
I want to Enter and Save Information for a Record (create New, or update an existing Record)
The following section describes the basic knowledge necessary to enter information into the application.
Since each client will have different Forms and Pages, this information will be kept generic.
Entering Information
|
For the task of ...
|
I need to ...
|
Entering a Date
|
Either
- enter the date manually
- click on the Calendar Icon, and pick the date from the Date Picker
- click on the Date Icon to set the date to TODAY.
|
Selecting Items from a predefined List of Values.
Sometimes, the List of Values which is available to Users may be filtered. See below for more information.
|
Some fields only allow the user to select from a list of values. The method of doing so will depend on the field types.
When the type is
- Radio Button, or Checkbox:
click on the selected value - Selection Lists, which are identified by having a
 symbol next to them: symbol next to them:- Click on the symbol
- Select the Value(s) from the Selection List, and then click OK.
- If necessary, you can sort and search this List like you would in a View.
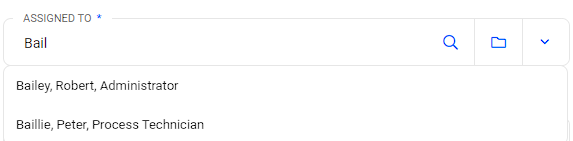
- Click on the
 symbol and select the required value. symbol and select the required value. - Start typing the value you are looking for, the system will gradually narrow down the available selection(s).
- Matrix Fields, which are displayed as a control with 2 or more sliders.
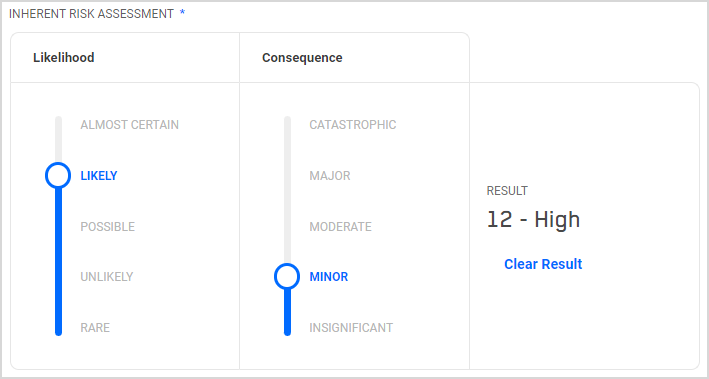 - Drag the Control(s) to the desired value(s). The system will automatically display the corresponding Result.
- If enabled, you can reset the Matrix to a "blank" value by clicking on the Clear Result button.
|
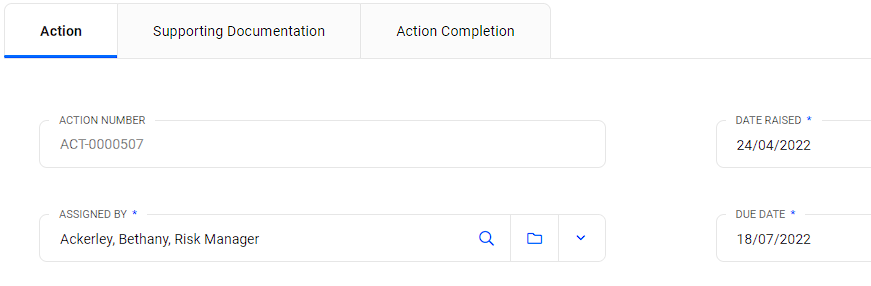
Adding a new Record which "related" to Record in the current Form, for example:
- an Action to an Incident
- an Action Progress Record to an Action
- Documents which are related to a Meeting
|
Click on the Add New button.
and then fill in the information as per normal.
|
Viewing and modifying already existing related Records.
|
This will depend on the way these related records are being displayed.
- As Component Lookups
Depending on the field properties, related records can either be viewed only via the "Quick View" (icon = ), or they can be opened and modified using a full Form (icon = ), or they can be opened and modified using a full Form (icon =  ). For example: ). For example:
 - As Subforms:
Existing records displayed within a view. You will need to open the subform before you can view the full content or modify the record.
- As a Grid Form or Inline (like a Spreadsheet):
To modify a cell, click on it and enter the required information.
|
Entering or Modifying a Hierarchical data represented as a tree view, for example:
- Responsible Department for an Incident
- Location for an Incident
|
Selection List:
- Click on symbol to open the selection list.
- To find a specific record, you can:
- Use the "Quick Search" on the left panel to enter a value (e.g. Department Name)
OR - Type a keyword directly into the search field of a specific column.
- Press enter or click the
 symbol to run the search. symbol to run the search. - The hierarchy will update to show:
- Matching records,
- Their parent nodes (brought to the top),
- All matches will be highlighted in bold.
Note:
If you're searching across multiple columns, a record will only appear if it matches all the criteria entered in each column.
|
Saving a record
|
You can either:
- Click on the Save button above the current form (only available while on the main form)
- or on the floating icon on the bottom right corner (which can be used at any time).
|
Fixing a validation error, which prevents my record from being saved.
|
Your system will have a range of validations which will ensure that users will enter valid, and/or complete data.
The vast majority of validations will be displayed immediately after editing a field. Once a validation is triggered, the system will display the corresponding error message directly beneath the field in error:

As some fields can be 'out of sight' at the time they become 'invalid', the system will again check all validations when the record is saved.
Limitation: if the WHEN condition for a validation includes a Read-only field, the validation will only be triggered on Saving the record.
|
If there are multiple validation errors, seeing all of them.
|
When validations are triggered upon saving of a record, a summary of all failed validations will be shown on top of the page.
You can access the field in error by simply clicking on the corresponding line.
|
While being in a Form, to navigate directly to a Page on the Form.
|
This will depend on the display type of the Form.
- Tabbed Form:
Click on the Tab which you need to navigate to.
 - Non-Tabbed Form:
You will need to scroll down the Form to access the requested page.
|
View/download a file attachment
|
- You can preview certain file types (e.g. images and PDF) by clicking directly on the attached file.
- If a file type cannot be previewed, a message will appear along with a download link.
- To download a file:
- Subform: Click the download icon
 next to the attachment. next to the attachment. - Multi File Drag Drop: Click on the download icon
 to download one file at a time OR click on the "Download" link to download all files visible on the page. to download one file at a time OR click on the "Download" link to download all files visible on the page.
|
Saving a record as a PDF file
|
A record can be printed to PDF from within a form by selecting
Wrench  Save to PDF. Save to PDF.
The resulting PDF file will be a close approximation to the layout of the underlying form, and will display the following:
- Values for all fields on all of the currently visible pages of the current record.
- The subform records on the 1st level will be printed in their 'expanded' and detailed form (e.g. Incidents Actions)
- 2nd level subforms will only be shown as a list (e.g. Incidents Actions Action Progress).
|
I want to Update Multiple Records (Bulk Update)
The Bulk Update functionality allows users to apply the same change to multiple records in bulk.

|
NOTE
The following Policy Roles are required to use this functionality:
- Policy Role - Bulk Update: required to perform Bulk Update
- Policy Role - Bulk Update Disable Actions:
Users with this role can disable the triggering of Actions during the Bulk Update process, targeted for Power Users/Administrators. - Policy Role - Bulk Update Disable Validations:
Users with this role can turn off Validations during the Bulk Update process, targeted for Power Users/Administrators.
|
The Bulk Update process will
- respect all existing Form Validations by default
- Users with 'Policy Role - Bulk Update Disable Validations' can turn off validations
- trigger Form Actions as defined by default
- Users with 'Policy Role - Bulk Update Disable Actions' can disable Actions being triggered
- trigger Analytics Rules as defined
- adhere to the Security configuration
Bulk Data Update
|
For the task of ...
|
I need to ...
|
Selecting the Records for Bulk Update
|
- Navigate to a List View that contains records you intend to update.
- Use the Add/Remove columns functionality to add the columns (from the root component and/or from a 1:1 related component) you want to update to the List View.
- Select the records you want to update.
|
Performing Bulk Update
|
After having selected the records which need updating
- From the Wrench Menu, select Bulk Update
- The resulting pop-up window displays all supported fields (see below) from the current List View which can be bulk updated.
- For each of these fields, users have the option to either:
- Enter/select a new value
- Clear the field - Fields where neither a new value, nor the Clear option has been selected will remain un-touched by the process
- Clicking Apply will update the selected record(s) and perform any Actions which may have been triggered by the changes.
- If the changes should trigger a Validation, then
- the system will display a Summary of the records where a Validation rule has been triggered, identifying the record(s) and all validations which have been triggered
- records where a Validation failed will NOT be saved
- other records in the current selection which do not violate any Validation will be saved. - If the changes are done on a field(s) in a 1:1 related record where the 1:1 related record does not exist, the system will display a message indicating the same.
|
Turning off Actions and Validations
|
Users with the corresponding Policy Roles can turn off Actions and/or Validations by de-selecting the respective flags.
NOTE:
turning off Actions and Validations allows users to modify records circumventing the defined workflow rules.
|
Supported Field Types for Bulk Update
The following field types are supported for Bulk Update operation:
- Date
- Text
- Single Lookups
- Single Component Lookups
Why the selection list may have limited items
Selection lists may be limited because of any one or combination of the following:
- Mandatory filters: you cannot remove these restrictions.
- Optional filters: these can be toggled on and off for Single or Multiple Selection Lists (see the notes below).
- Filters may limit the hierarchical level you can see in a tree view so you can only see child nodes.
- The selection list is a 'child' of another selection list - the list of items displayed depends on the item selected in the 'parent' list.
|
OPTIONAL FILTERS
- It is possible to toggle optional filters on / off using the Filter toolbar button.
- When an optional filter is applied this button will be displayed with an orange background.
- Clicking on the drop down arrow will display the name of the optional filter; clicking on the name of the filter will toggle it on / off.
- Clicking on the Filter part of the button will toggle the optional filter on / off.
NOTE
- Optional filters are always applied for Search Component Lookups; they cannot be toggled on / off.
- By default, the optional filter will always be applied when the component lookup list is opened.
- Tree View: Optional filters appear next to the Quick Search. Clicking on the drop down arrow will display the name of the optional filter(s); clicking on the name of the filter or checking/unchecking the box next to the filter will toggle it on / off
|
A few things I need to know about the System Behavior
While entering information, you may have a few questions about the following.
System Behavior
|
Question
|
Answer
|
When I create a record, why are some fields already filled with a value?
|
This will occur when a "Default Value" has been applied to a field.
|
Why can't I update some fields?
|
Some fields are either
- for information purposes only
- will be calculated (for example an "Incident Number"), or have been defaulted (for example "Date Raised") by the system
- configured to be protected - based on factors like record content, status and/or your access rights within the web application
and therefore have been defined to be "Read Only" for all, or some users.
|
Why do sometimes Pages/Tabs on a Form appear, or disappear?
|
Most Forms are designed, so that Pages only appear when necessary. For example, the Incident Form will only display the Page for Motor Vehicle Accidents when one of the Consequences of the Incident was a Car Accident.
|
|
